The wastewater from your home goes through a septic tank to be treated and then returned to the soil. If you flush non-biodegradable waste items like cigarette butts, cotton buds, swabs, or menstrual hygiene products, they can clog your septic system.
Solid waste sinks to the bottom, and liquid waste flows out of the septic tank into the drain field (also known as the absorption field). Water seeps through the soil, where microorganisms further purify it. Click https://www.septictankarmadale.com.au/ to learn more.
Septic tank systems are simple onsite sewage treatment systems that can be used in areas that don’t have municipal sewer connections. They are typically buried underground and consist of one or two tanks that collect domestic wastewater. Wastewater from toilets, washing machines, and sinks flows into the tank for basic sewage treatment. Solids and organic matter are separated from the liquid effluent, which then seeps into a septic drain field for further treatment and dispersal. Because the septic system relies on a large area for drainage, it’s usually unsuitable for densely built areas.
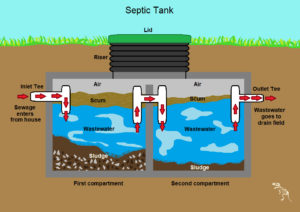
The septic tank consists of a concrete, fiberglass or plastic structure that houses a collection and decantation process that allows the sewage to separate into three layers:
- Scum rises to the surface.
- Solids sink to the bottom of the tank.
- Partially clarified liquid effluent exits from the top.
The septic tank provides primary sewage treatment, which prevents sewage from polluting the soil and freshwater supplies.
It is vital to keep a septic tank properly pumped. This will help to avoid sewage backups inside your home, and it will also keep the tank from becoming full too quickly. If you’re looking at a property with a septic tank, make sure you ask to see its inspection records. If the tank needs to be pumped, you’ll want to know ahead of time so that you can plan accordingly.
Another important septic tank maintenance tip is to use septic-safe toilet paper and to limit your household water usage. Doing so will minimize the amount of sewage that enters your drainfield and leach field. It’s also a good idea to plant grass or other low-growing plants that won’t overgrow the septic tank and leach field.
Lastly, if you hear gurgling in your plumbing when you flush your toilets or wash laundry, it’s a sign that the tank is getting full. The gurgling sound is caused by air pockets that form in the lines when the tank is filling up. This is a sign that it’s time to have the tank pumped.
Septic Tank Design
A septic tank is a large underground concrete or fiberglass container through which domestic wastewater (sewage) flows for basic sewage treatment. Sewage from household toilets, bath and sink drains, kitchen drains and laundry flow into the tank. There it goes through a process of settling and anaerobic digestion that reduces solids and organic material. Eventually, the liquid effluent exits to an absorption field or other onsite sewage treatment system for further treatment.
The tank must be designed with devices that help ensure settling, retention of solids and venting. These include inlet and outlet baffles, sanitary tees and transfer pipes that connect the tank’s two chambers. The inlet and outlet baffles keep the inlet pipe clear of the scum layer that forms at the top of the effluent and the outflow pipe free of the sludge layer at the bottom of the tank. The sanitary tees and transfer pipe ensure that the liquid effluent is gently pumped into and out of the tank, avoiding any turbulence that could damage the tanks interior or cause blockages.
The liquid effluent leaves the septic tank through a distribution device, which ensures that equal amounts of liquid leave each drainpipe. It then enters the septic absorption field, which is a network of perforated pipes in the soil. The microbes in the soil, along with further bacterial action, treat the effluent so that it is safe for re-use in drinking water.
The tank size must be adequate for the number of bedrooms in the home. The tank must also be large enough to allow for a 48-hour retention time so that all of the solids in the sewage have a chance to decompose. It’s also important that the septic tank be situated so that rainwater doesn’t enter it, as this would affect the bacterial activity within. Moreover, the tank should be sited in such a way that it will not collapse or crack under the weight of the water and sludge inside. In general, septic tanks are made of materials that are resilient and strong enough to withstand ground movement.
Septic Tank Installation
While installing a septic system is not as difficult as it may seem, it requires specialized knowledge and equipment to ensure a safe and complete job. It also involves working with dangerous materials such as sewage and chemicals. It is highly recommended that homeowners work with a professional to avoid serious problems and costly repairs.
A septic tank is a buried, water-tight container usually made of concrete or fiberglass. A healthy population of anaerobic bacteria lives at the bottom of the tank and digests organic waste. A baffle or outlet prevents sludge and scum from leaving the tank, while liquid wastewater (effluent) exits via a pipe into the drainfield area.
The drainage field is a shallow area of uncovered land that filters untreated wastewater through rocks, dirt and sand to remove impurities. The water then seeps into underground aquifers or surface waters through transpiration and evaporation. A septic tank, perforated pipes and drainfield work together to treat waste and safely eliminate it from the home.
A septic tank installer should always obtain the necessary permits before beginning any excavation or construction on the site of the tank. Depending on where the installation site is located, you may need to obtain a building permit, permit to dig, utility permit or occupation permit. In addition, you must be aware of any underground utilities in the vicinity of the installation site and have them marked before excavation begins.
During excavation, the installer must create a hole large enough to fit the tank. The soil that is removed needs to be properly disposed of, or it could affect the performance and lifespan of the entire septic system.
A septic tank installation company can determine the size of the septic system required for your home and provide you with all the proper parts, including a tank, perforated pipes, baffles, lids, risers and a septic pump. They can also advise on the best location for your septic tank on the property. They will also inspect the condition of the existing drainfield to make sure it is up to code and ready for a new septic tank to be connected.
Septic Tank Maintenance
The septic tank is a water-tight container that holds wastewater until bacteria in the soil can break down solid waste and liquid sewage. The waste flows into the septic tank through drain pipes from sinks, tubs and toilets in your home. The solid waste sinks to the bottom of the tank in the form of sludge, while the oil and grease floats to the top as a scum layer. A baffle separates the inlet and outlet sides of the tank. Water enters the tank through the inlet side, where a network of perforated pipes extend into the drainfield area’s soil. The liquid wastewater (effluent) exits the tank through a T-shaped outlet.
Septic tanks need to be pumped regularly. A full tank can lead to clogs in the drainpipes and soakaway, as well as an overflow of the septic system. It is possible to reduce the need for pumping by following some simple maintenance tips.
Only use toilet paper that is septic safe. Don’t flush sanitary products, such as tampons, sanitary wipes and diapers, which contain plastic elements that are not digestible by the good bacteria in a septic tank. Also, do not pour toxic chemicals down the drains, such as paints or flammable cleaning formulas. These chemicals can kill the good bacteria in a septic system.
It is a good idea to keep track of your septic system maintenance records and have them available if you ever decide to sell your home. Having comprehensive maintenance documents can make your home more appealing to prospective buyers.
Avoid driving vehicles or parking large equipment over the septic tank and drainfield. These actions can damage the tank and absorption field and leave an unsightly mess.
Ensure that the drainfield is not covered with grass, gravel or other impermeable surfaces. Covering the drainfield with these materials can cause septic system failure and require costly repairs. Also, don’t plant trees or shrubs near the septic tank or drainfield, as tree roots can clog and penetrate pipes. Finally, add 8 to 12-inches of mulch around the septic tank and drain field to protect the ground from compaction by heavy vehicles or equipment.